


How to make Calendar in Python | Tkinter Project
How to make Calendar in Python | Tkinter Project
In our previous articles, we learned the basics about “Tkinter”. We also used other python libraries to give more functionality to the application.
In order to develop a GUI application we use Tkinter. Through this article, we’ll create a beautiful GUI application using Tkinter and calendar module.
But I would suggest reading my previous articles for a better understanding of “Tkinter” because here we are also creating a GUI by adding widgets.
Let's discuss how we can create this application GUI.
First of all, we need to import libraries.
Here we are going to create two GUI. The first is for displaying the calendar and another will act as a main() function. The main function is python can be used in two ways lets discuss this first.
First approach:
- create main.py
- create file.py
- import main.py in file.py to run the main function.
Second approach:
- create single .py file
- write normal code there
- and use if __name__ = __main__ this will directly run the main function whenever the code section is written below will be called.
Note: python files can act as either reusable modules or as standalone programs.
Every python module has its __name__ defined and if this is
assigned to “__main__”, it implies that the module is being run standalone. This is used to execute some code only if the file is being run directly not imported.
Calendar Module:
Python has an inbuilt module “calendar” and it is used to handle
Calendar related operations. It has a class called calendar that
Allows no. of task based on date, month, and year. It outputs the calendar in HTML format.
By default, the first day of the week starts from “Monday” and last day
Of week as “Sunday”.
Functions:
- calendar(year,w,l,c):- this displays year, the width of characters,
number of lines per week, and column separation.
- first weekday() : this returns first weekday number,by default 0 is returned i.e Monday.
- isleap(year):- this function checks if specified year is leaped
or not.
- leap days(year1,year2):- it returns the number of leap days between specified years in the argument.
- months(year, month,w,l):- It prints month of the specified
year in arguments. It takes 4 argument year, month, the width of the character, and a number of lines per week.
Now, let's discuss how we can create this application.
Code:
# importing all files from the tkinter
from tkinter import *
# importing calendar module
import calendar
# Function for showing the calendar of the given year
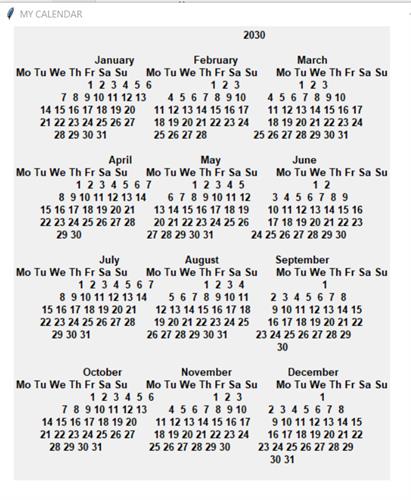
def showCal() :
# Create a GUI window
root= Tk()
# Set the background colour of GUI window
root.config(background = "white")
# set the name of tkinter GUI window
root.title("MY CALENDAR")
# Set the configuration of GUI window
root.geometry("650x700")
# using constructor int() we are type casting the string text that we through get() method
fetch_year = int(year_field.get())
# calendar() method of calendar module returns the calendar of the given year .
cal_data = calendar.calendar(fetch_year)
# Create a label for showing the content of the calender
cal_year = Label(root, text = cal_data, font = "Lucida 10 bold")
# grid() method is used for placing the widgets at respective positions in table i.e 2-D like structure
cal_year.grid(row = 7, column = 1, padx = 20,)
# start the GUI
root.mainloop()
# Driver Code:
#this mechanism ensures,the main function is executed only as direct run not when imported as module.
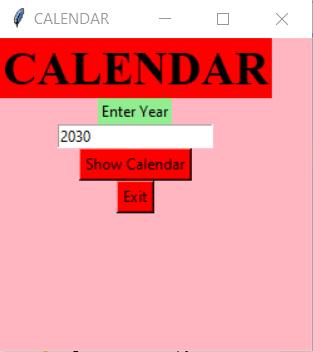
if __name__ == "__main__" :
# Create a GUI window
gui = Tk()
# Set the background colour of GUI window
gui.config(background = "light pink")
# set the name of tkinter GUI window
gui.title("CALENDAR")
# Set the configuration of GUI window
gui.geometry("250x250")
# Create a CALENDAR : label with specified font and size
cal = Label(gui, text = "CALENDAR",bg="red",font = ("times", 28, 'bold'))
# Create a Enter Year : label
year = Label(gui, text = "Enter Year", bg = "light green")
# Create a text entry box for filling or typing the information.
year_field = Entry(gui)
# Create a Show Calendar Button and attached to showCal function
Show = Button(gui, text = "Show Calendar", fg = "Black",
bg = "Red", command = showCal)
# Create a Exit Button and attached to exit function
Exit = Button(gui, text = "Exit", bg = "Red", command = exit)
# grid method is used for placing
# the widgets at respective positions
# in table like structure.
cal.grid(row = 1, column = 1)
year.grid(row = 2, column = 1)
year_field.grid(row = 3, column = 1)
Show.grid(row = 4, column = 1)
Exit.grid(row = 6, column = 1)
# start the GUI
gui.mainloop()
Output:
Hope you like this article, if you find it useful then share it with your friends. And stay tuned for upcoming articles.
Till now,
Happy learning😊😊
