


How to create a simple Registration Form using Tkinter in Python
Before starting, we must have some knowledge of tkinter. So first we will go through this tkinter module and after that, we will create a simple registration form.
What is Tkinter?
Python offers many options for developing GUI but Tkinter is used mostly.
Tkinter is a standard python library. Python with tkinter module is the fastest and easiest way to develop an object-oriented GUI application.
It provides us a variety of common GUI(graphical user interface) elements that we can use to build our user interfaces like buttons, menus, and various kinds of entry fields and display areas.
Tkinter widgets
- Frame: acts as a container and it is used to organize and hold other widgets.
- Text: It provides a formatted text display and allows us to display and edit text with various styles.
- Label: Used for viewing images and text but we can’t interact with it.
- Button: Used to add buttons and we can add methods and functions to it.
- Radiobutton: Used to implement one of many selections.
- Checkbutton: Used to implement on-off selections.
- Combobox: It is a dropdown list widgets for selections of one from the dropdown list.
- Listbox: It contains text items only and all are of the same font and color.
- Scrollbar: This provides a slide controller.
- Sizegrip: This widget is used to resize the contained windows by pressing and dragging the grip.
- ProgressBar: It provides visual feedback on the process of operation or in a simple way it acts as an indicator.
- Entry: This widget accepts single-line string text
- Labelframe: This widget is used as a spacer or container for complex window layout.
- PanedWindow: This is a container widget that may contain a number of panes, arranged horizontally and vertically.
- Canvas: This widget is used to implement custom widgets.
- Treeview: This widget is used to present a hierarchical structure that can be revealed or hidden by the mouse's actions.
- Scale: This widget provides graphical slider objects that allow us to select various values from the scale.
- Separator: This widget is used to place a vertical and horizontal bar between various widgets.
- Spinbox: This widget is an alternative for entry widget, it can be used to provides a range of values out of which the user can select the one.
How we can use Tkinter in Python?
Step1: Import the tkinter module (from tkinter import * or simple import tkinter)
Step2: Created the GUI application's main window.
Step3: Add one or more widgets(controls like buttons, labels, and text boxes, etc) to GUI application.
Step4: Enter the main events to take action against each event triggered by the user.
Code for Registration Form:
Alright guys, Now let start creating a simple registration form without any backend work, just a simple registration form. It can be used further in the future for database connectivity.
Through this code, we will create a simple registration form using Tkinter widgets. Few widgets that are used for creating this form listed below:
- Labels
- Text fields
- Checkbox
- RadioButton
- Dropdown List
#how to create simple GUI registration form.
#importing tkinter module for GUI application
from tkinter import *

#Creating object 'root' of Tk()
root = Tk()

#Providing Geometry to the form
root.geometry("500x500")

#Providing title to the form
root.title('Registration form')

#this creates 'Label' widget for Registration Form and uses place() method.
label_0 =Label(root,text="Registration form", width=20,font=("bold",20))
#place method in tkinter is  geometry manager it is used to organize widgets by placing them in specific position
label_0.place(x=90,y=60)

#this creates 'Label' widget for Fullname and uses place() method.
label_1 =Label(root,text="FullName", width=20,font=("bold",10))
label_1.place(x=80,y=130)

#this will accept the input string text from the user.
entry_1=Entry(root)
entry_1.place(x=240,y=130)

#this creates 'Label' widget for Email and uses place() method.
label_3 =Label(root,text="Email", width=20,font=("bold",10))
label_3.place(x=68,y=180)

entry_3=Entry(root)
entry_3.place(x=240,y=180)

#this creates 'Label' widget for Gender and uses place() method.
label_4 =Label(root,text="Gender", width=20,font=("bold",10))
label_4.place(x=70,y=230)


#the variable 'var' mentioned here holds Integer Value, by deault 0
var=IntVar()

#this creates 'Radio button' widget and uses place() method
Radiobutton(root,text="Male",padx= 5, variable= var, value=1).place(x=235,y=230)
Radiobutton(root,text="Female",padx= 20, variable= var, value=2).place(x=290,y=230)


##this creates 'Label' widget for country and uses place() method.
label_5=Label(root,text="Country",width=20,font=("bold",10))
label_5.place(x=70,y=280)

#this creates list of countries available in the dropdownlist.
list_of_country=[ 'India' ,'US' , 'UK' ,'Germany' ,'Austria']

#the variable 'c' mentioned here holds String Value, by default ""
c=StringVar()
droplist=OptionMenu(root,c, *list_of_country)
droplist.config(width=15)
c.set('Select your Country')
droplist.place(x=240,y=280)

##this creates 'Label' widget for Language and uses place() method.
label_6=Label(root,text="Language",width=20,font=('bold',10))
label_6.place(x=75,y=330)


#the variable 'var1' mentioned here holds Integer Value, by default 0
var1=IntVar()
#this creates Checkbutton widget and uses place() method.
Checkbutton(root,text="English", variable=var1).place(x=230,y=330)


#the variable 'var2' mentioned here holds Integer Value, by default 0
var2=IntVar()
Checkbutton(root,text="German", variable=var2).place(x=290,y=330)

#this creates button for submitting the details provides by the user
Button(root, text='Submit' , width=20,bg="black",fg='white').place(x=180,y=380)


#this will run the mainloop.
root.mainloop()
Once you'll use the same code, you'll get the below output.
OUTPUT:
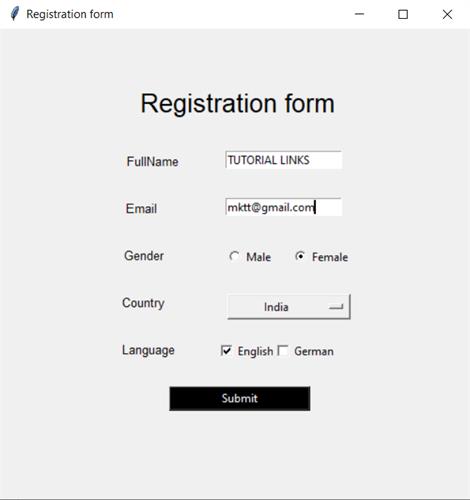
Hope you like this article, if you find it useful do share with your friends, in an upcoming article we will learn how to provide database connectivity for each of these options used here.
So till now, Happy Learning.😊😊
