


What is Google Cloud Function?
Introduction to Google Cloud Function
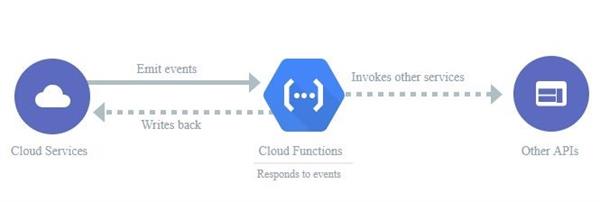
Cloud Functions is a lightweight, occasion-based that permits you to make little, single-purpose works that react to cloud events without the need to deal with a server or a runtime situation. You can utilize these capacities to build applications from scaled-down business logic. You can likewise use Cloud Functions to associate and expand cloud administrations.

Your function is activated when an occasion being watched is terminated. Your code executes in a completely overseen condition. There is no reason for an arrangement of any foundation or stress over dealing with any servers. You are charged, to the closest 100 milliseconds, just while your code is running.
Cloud Functions can be composed utilizing JavaScript, Python 3, Go, or Java runtimes on Google Cloud Platform. You can take your capacity and run it in any standard (Node.js 10), Python 3 (Python 3.7), (Go 1.11 or 1.13), or (Java 11) condition, which makes both transportability and nearby testing a breeze.
Features of GCF
- Connect and Extend Cloud Service: Cloud Functions gives a layer of logic that lets you compose code to associate and expand cloud administrations. There exist cloud benefits and permits you to address an expanding number of use cases with programming. It approaches the Google Service Account and validated with most of Google Cloud administrations, including Cloud Vision, just like numerous others. It is supported by various Google Cloud customer libraries.
- Events and Trigger: Cloud events are things that occur in your cloud. It may be like changes to the information in a database, documents added to storage. Events occur whether you want or not. For making a reaction to an event we use a trigger. A trigger is an assertion that you are keen on a specific event or set of events. By use of the binding function, you can capture and act on the event.
- Serverless: The software and infrastructure are controlled by Google i.e. managing and configuring server, updating the framework, and patching OS so only work is to add code. As a response to the Event, it automatically calls the resources.
- Use case: There is no need of own server and developer for maintaining it, as only deploy a function integrated to the event and now it automatically executes. Some of the Cloud function use cases are Data Processing, webhooks, Lightweight APIs, Mobile Backend, and IoT.
Types Of GCF
There are two types of Google Cloud function:
- Synchronous Function: It is also called Foreground Function, which directly invoked HTTP endpoint to provide for the function. They are also knowns as HTTP triggered Functions. Executing your Google Cloud Function needs to flag your function to run. This is known as a trigger. The HTTP trigger originates from a request sent to your Function or can be an event from Google Pub/Sub occasions, stack driver, or a Firebase Event.
The command for how to call the function :
curl -X POST HTTP_TRIGGER_ENDPOINT -H “Content-Type:application/json”'{"name":"Jane"}'where HTTP_TRIGGER_ENDPOINT(https://YOUR_REGION-YOUR_PROJECT_ID.cloudfunctions.net/FUNCTION_NAME)
- Asynchronous Function: It is also called Background function, which indirectly invoked an event that triggers the function. It supported by Google Storage and Pub/Sub events. They create multiple use cases:
- Data Transfer
- IoT message processing
- Watching logs and responding to indicated changes inside the infrastructure.
Execution Environment
Cloud Function has some point which we have to know as dealing with it. As we know Google Cloud Function run-in serverless environment, a single-server platform in which google has full control on your behalf according to its OS, and run-time. Each function automatically secure execution and scaling towards other function. There are some points as follows:
- Cloud Function supports multiple runtime languages such as Node.js10, python, Java, and so on. Updates to the runtimes are commonly done naturally, except if in any case informed. All runtimes get automatic updates to the language variant as they are made accessible to the language network.
- Cloud Functions execute the serverless paradigm, in which you simply run your code without stressing over the basic foundation, for example, servers or virtual machines.
- Cases of function assign the request which handles by Google Cloud. Each function handles just a single simultaneous request at once. This implies while your code is handling one request, there is no chance of a subsequent request being steered to a similar case. In this way, the first request can utilize everything of assets (CPU and memory) that you mentioned.
- In a given time, it allows setting the number of function instances that co-exists where in some cases, unbounded scaling is limited.
- A new function can have a cold start in 2 ways:
-
- When deploying the function
- The new instance created automatically and replace by the existing one.
Benefit of GCF
- Event-Driven: We can compose event-based Google Cloud work that occurs on GCP like File transferred on Cloud Storage or Google Firebase changes and so on.
- Automatic Scaling: Developers need not plan the limit with regards to servers as it gets scaled here and there relying upon increment or decline of requests.
- No Server Management: Runs on the Google cloud framework, so all H/w and S/w necessity is deal by Google.
- Pay what you use: This is compensation for each use of Google Cloud Platform.
- Incorporated Services: Integration with other Google Cloud Platform administrations, for example, GCP, Google Firebase, and Google Assistance.
First Google Cloud Function
To create your Google Cloud Function, we start with a simple “Hello Everyone” function.
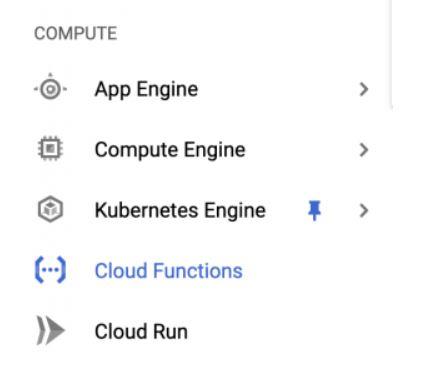
Firstly open in Google Cloud Console, use the menu left-hand top of the screen after that go to under Compute Engine, and select Cloud Function.
From there, see on top of the bar, Click “Create Function”.
![]()
Step1: Change the name according to your preference so that it may easy to recognize.
Step2: Keep default 256MB in memory allocated.
Step3: Note down the URL, as it may use later
Step4: Keep all boxes checked in the Allow unauthorized invocation section.
Step5: for runtime, keep the Node.js8 default.
Step6: The inline editor should have already filled with “Hello World” as default.
Step7: The option Function to execute is already setup.
Step8: Click on create to deploy the function.
If it’ll be done, use the URL you note down and execute it. If you do not remember the URL, Click the function name and then click the trigger tab. The URL listed there, then execute it into the browser and you get the Function.
