


Understanding grids in Bootstrap | Rows and Columns in Bootstrap
Understanding grids in Bootstrap | Rows, and Columns in Bootstrap
Introduction:
Bootstrap provides a very user-friendly as well as a responsive grid system for webpage development. It works responsively due to built-in flexbox properties. This uses a series of elements that include a container, row, and column.
Pre-requisite:
To start with implementing a grid system with rows and columns, make sure that you have linked your file with Bootstrap CSS and JS. After that, you can proceed with declaring .conatiner inside the body. What it does is that it will create a section in the document which will have pre-defined padding for the content. To take up the full width we use .container-fluid, this will take 100% width for the content
Methods and Working:
Rows are declared in the initial phrase to have a grid system. There can be many rows inside a document. Each row acts as a wrapper for elements inside it ( columns). It has predefined padding for each row, which is to separate every row from each other. This padding can be removed by giving it a styling of negative padding. The rows and columns can be nested which means that inside one row there can be several rows and columns, similarly inside a column, there can be several rows and columns.
Every column is declared in a row, multiple columns can be inserted in a row, keeping in mind to have not more than 12, since each row has a grid of 12 to hold elements. When we declare a column in a row and add some elements inside it, small horizontal padding can be seen on both sides which is known as the gutter. This padding can be increased as well as decreased too.
Example:
<div class="container">

      <div class="row">

        <div class="col" style="background-color: red;">column 1 of row 1</div>

        <div class="col" style="background-color: skyblue;">column 2 of row 1</div>

      </div>

      <div class="row">

        <div class="col" style="background-color: skyblue;">column 1 of row 2</div>

        <div class="col"style="background-color: red;">column 2 of row 2</div>

      </div>

</div>
Most of the time, the user requires columns more than its defined width or wants to occupy 12 spaces of columns by declaring 3 columns in a row. To get this we can distribute the columns spaces evenly or oddly between the columns. For example .col-4 this will create a column which will have a width equal to 4 columns. These widths can be changed using % too, and the main thing is that they can resize themselves according to their parent element.
Example:
 <div class="container">

      <div class="row">

        <div class="col-2" style="height: 150px; background-color: red;">column 1 of row 1</div>

        <div class="col" style="height: 150px; background-color: skyblue;">column 2 of row 1</div>

      </div>

      <div class="row">

        <div class="col-8" style="height: 150px; background-color: yellow;">column 1 of row 2</div>

        <div class="col" style="height: 150px; background-color: red;">column 2 of row 2</div>

      </div>
</div>
Then comes the breakpoint for the columns inside the rows. These breakpoints vary pixels to pixels. We can include different arrangements of columns at different breakpoints. This means that if 3 columns of 4 spaces width are to be displayed (4*3=12) in larger screen (960px) and when it reduces than that we want one column in a full row then we can simply add a breakpoint for this.
The available breakpoints are:
.col- .col-sm- .col-md- .col-lg- .col-xl-
Where xl, lg, md, sm and none are for the pixels greater than equal to 1200px, 992px, 768p, 576px and less than 576px respectively.
Example:
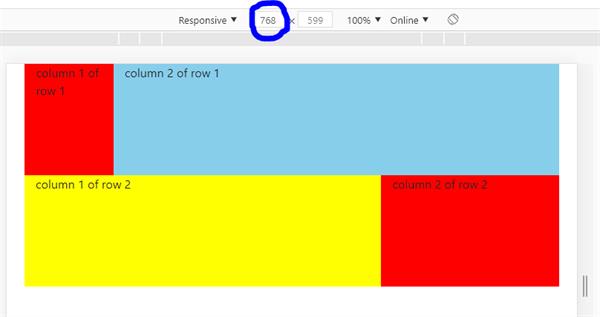
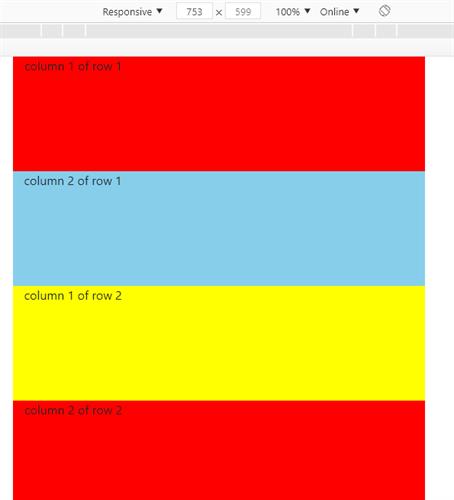
<div class="container">

      <div class="row">

        <div class="col-md-2" style="height: 150px; background-color: red;">column 1 of row 1</div>

        <div class="col" style="height: 150px; background-color: skyblue;">column 2 of row 1</div>

      </div>

      <div class="row">

        <div class="col-md-8" style="height: 150px; background-color: yellow;">column 1 of row 2</div>

        <div class="col" style="height: 150px; background-color: red;">column 2 of row 2</div>

      </div>

</div>
In the above code, it used .col-md- to define the spaces the column will take when it will be greater than or equal to 768px.
At 768px
Less than 768px
Apart from this, there are many other methods that can be used in the grid, such as giving alignment to the element, setting rows columns, and many more. Each can be implemented by adding different classes in the HTML file.
For more reference make sure to read the documentation on the grid in Bootstrap Official Page.
