Arduino Motor Shield
Arduino Motor Control shield is a motor driver shield which can be used with Arduino UNO and MEGA board for controlling various type of motors.
Arduino motor shield is based on L293D motor driver which allow DC motors to drive on either direction. It means you can control set of two dc motor with a single IC.
L293D chip consists of two H-Bridge circuit inside the IC which make it possible to rotate two motors independently. Due to its small size, L293D is an ideal choice for robotics applications,
L293D motor driver which can be used to drive:
- One 4 Wire stepper motor
- 2 to 6 DC Motor
- 2 servo motor
L293D motor driver specification:
- MAX current: 6000mA per channel
- Peak output current: 1.2 Amp
Board description:
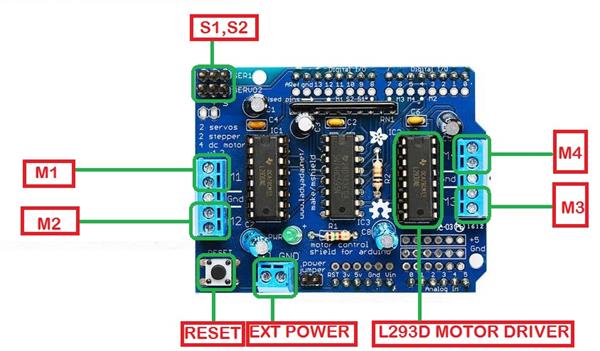
S1, S2:
Used to control servo motors MAX-2
M1, M2, M3, M4:
Used to control DC motors MAX-4
RESET:
Used to reset board
EXT POWER:
Used to provide power from external source.
L293D MOTOR DRIVER:
Main motor driver chip to control motor direction.
Working with Arduino motor control shield:
Hardware and software requirements:
- L293D H-Bridge motor Driver shield
- Arduino UNO
- DC Motor
- “Motor.h” Library
- Arduino IDE
How to control Motor using Arduino:
Step 1:
Attach Arduino Motor control shield to Arduino
Step 2:
Connection:
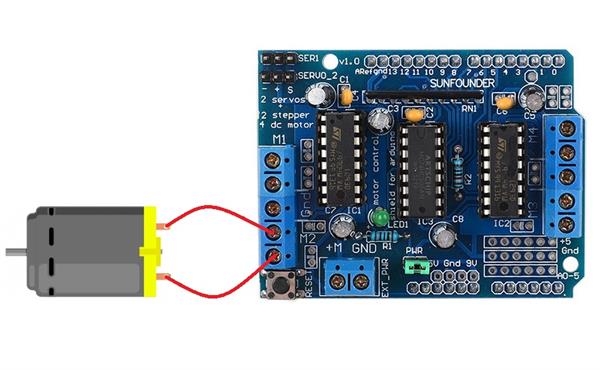
Connect DC motor wires to M2 Terminals
Step 3:
Uploading the code
Copy and paste the code below in Arduino
#include <Motor.h> //Import Motor.h Library

AF_DCMotor motor(2, MOTOR12_64KHZ); // Define motor #2, 64KHz pwm
/* AF_DCMotor motor(2);*/ Another way to define

void setup() {
  Serial.begin(9600); // Open Serial communication at baud rate 9600 bps
  Serial.println("Testing the Motor");

  motor.setSpeed(200); // Set the motor speed at 200 to 255 PWM
}

void loop() {
  Serial.print("....TURNING.... ");

  motor.run(FORWARD);      // turn it on going forward
  delay(1000); // delay at 1 second

  Serial.print("Turning Backward");
  motor.run(BACKWARD);     // the other way
  delay(1000); // delay at 1 second

  Serial.print("Release or Stop");
  motor.run(RELEASE);      // Motor will stop
  delay(1000); // delay at 1 second
}
Click on upload to upload the code to Arduino
Conclusion:
After uploading the code you will notice that motor will run:
- Forward for 1 sec
- Backward for 1 sec
- Stay still for 1 sec
You can make changes in the code for running motor in different direction on different speed