


How to use NPM Packages in Blazor Web Assemblies?
Using NPM Packages is much required for real-time applications coz it provides you many ready-made solutions for all your daily needs in development like Grids, Charts, Date selectors, and Gauges.
First, you should find a suitable NPM package for your need and with the following steps you can directly use that in your Blazor Applications also you can manage this with your C# logics with the help of JavaScript Interop in Blazor.
Follow the steps below along with me:
Step 1: Create a new Blazor WASM (Web Assemblies) Application.
Step 2: Create NpmJS folder
We’ll use this NpmJS folder to install NPM and also to install NPM Package locally into our application.
Now, open the command in the NpmJS directory and initialize npm by running the following command:
npm init -yAfter npm install, we need to install webpack and the webpack CLI as development dependencies by running the following command and this CLI will help us to build our NPM Package and will provide its output as a bundle that can we used in the Blazor application. So, let add Webpack CLI by running the following command in the same NpmJS directory:
npm install webpack webpack-cli --save-devAdd a new “index.js” file in the directory and we will use this for writing our business logic also to initialize our npm packages.
we need to modify the scripts section of the package.json file to add the following build script so that our Webpack can run the below command on its build request and can create the output file as the provided name “index.bundle.js” in “../wwwroot/js” although this path is not valid till now, we’ll create this in the next step.
"scripts": {
    "build": "webpack ./src/index.js --output-path ../wwwroot/js --output-filename index.bundle.js"
  },
Step 3: Find and install the required NPM packages
hope you have decided which package do you want to use in your application. I’ll use the gauges from Infragistics Ignite UI for Web Component just for this Demo and you can find more details about this in the official documents:
Official Documents for Ignite UI Web Components
Again, open your command line in the NpmJS directory and run the following command to have this beautiful gauge in your application:
npm install igniteui-webcomponents-core igniteui-webcomponents-gaugesIt’s a Web Component so we can’t directly use this with the Blazor dependencies we just need to initialize this with its NPM dependencies in our index.js created in the last step. Open the index.js file and add the following code to initialize the radial gauge.
// Module Manager for registering the modules of the chart
import { ModuleManager } from 'igniteui-webcomponents-core';

// Bullet Graph Module
import { IgcRadialGaugeCoreModule  } from 'igniteui-webcomponents-gauges';
import { IgcRadialGaugeModule } from 'igniteui-webcomponents-gauges';

// register the modules
ModuleManager.register(
    IgcRadialGaugeCoreModule,
    IgcRadialGaugeModule
);
In the above code script, we had imported the dependencies for IGC Radial Gauge and registered its modules.
Step 4: Add IGC Gauge in the Blazor component
You can create a new Blazor component for this demo or you can use any default component that comes with the template. I’ll use the default Home component to try this. Open your Home.razor file and define the igc-radial-gauge web component in your markup of the component as follows:
<igc-radial-gauge id="rg" height="400px" width="400px" value="25" interval="5" minimum-value="0" maximum-value="100">
    <igc-radial-gauge-range start-value="0" end-value="30" brush="red"></igc-radial-gauge-range>
    <igc-radial-gauge-range start-value="30" end-value="60" brush="yellow"></igc-radial-gauge-range>
    <igc-radial-gauge-range start-value="60" end-value="100" brush="green"></igc-radial-gauge-range>
</igc-radial-gauge>
In the above markup code we just provide some of the basic properties like value as 25, height and width also min and max values range for the gauge with three color brush ranges.
Let’s come back to the same command prompt and make a build to generate the “index.bundle.js” file for having its reference into the blazor application also before that don’t forget to create a “js” folder under the wwwroot directory. So, in the NpmJS directory and run the following command:
npm run buildI hope you must be heaving the “index.bundle.js” file at “../wwwroot/js” now. This is required for communication between the blazor application and the package you installed from NPM also While building and Blazor application it may possible our logics in “index.js” also need to build so for that can edit our “.csproj” file to add a new “PreBuildEvent” where we can exec some of the required NPM commands before the every build event of your application.
Modify the csproj to add a pre-build step that will run our npm build script
  <Target Name="PreBuild" BeforeTargets="PreBuildEvent">
    <Exec Command="npm install" WorkingDirectory="NpmJS" />
    <Exec Command="npm run build" WorkingDirectory="NpmJS" />
  </Target>
Just last thing before running this application include our newly generated index.bundle.js file just after the blazor.webassembly.js file in the “index.html”.
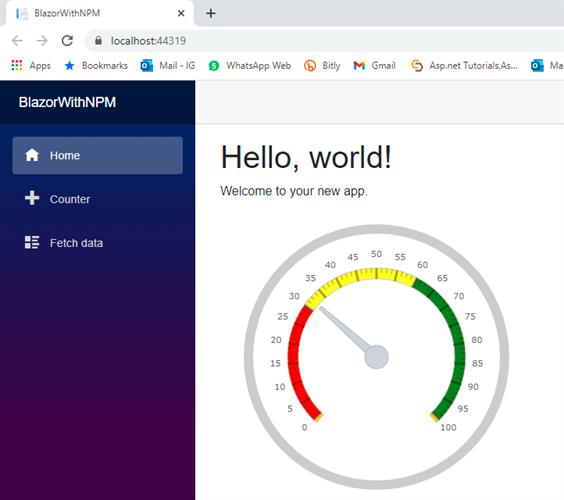
<script src="js/index.bundle.js"></script>Run your blazor application (ctrl + f5) and check the output in the browser.
Wow! 😊
This is running perfectly as we wanted to show the gauge and the default value is 25 that we have added in our home component now, if we want to change the value of this gauge, we need some event like button OnClick where we’ll request for javascript function using IJSRuntime service provided by Blazor.
Q. What is IJSRuntime?
Ans: IJSRuntime is a service provided by blazor to call javascript functions and this feature is known as JavaScript Interop in Blazor.
Back the visual studio and open home component and use the below points.
1. Inject the IJSRuntime dependency using @inject.
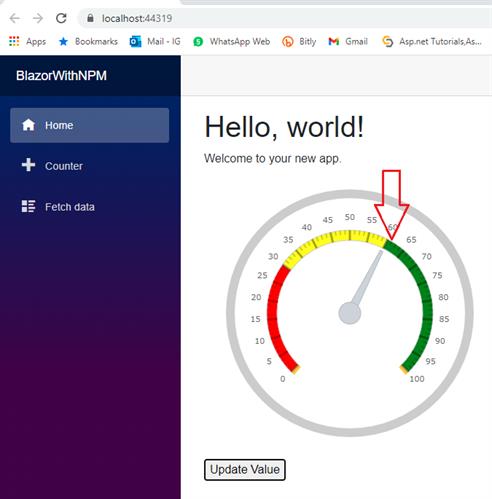
@inject IJSRuntime JSRuntime;2. Add a button with an onclick listener
<button @onclick="OnClick">Update Value</button>3. Add a new async method to call on the button click with the same name provided in the button handler.
@code {
async void OnClick()
{
    await JSRuntime.InvokeVoidAsync("updateValue", 60);
}
}
In the above function, we made a request for a JavaScript function “updateValue” with the parameter value for gauge as 60.
4. Edit your “index.js” file and add a JavaScript function “updateValue”
window.updateValue = function (value) {
    var rg = document.getElementById("rg");
    rg.value = value;
}
In the above function, we looked for the DOM element with the Id “rg” which is our Radial Gauge in the home component, and updated its value property with the new value.
Run your application and the NPM in the blazor application.
Thanks for reading.
