


How to create an Alarm Application in Android | Android Tutorial
How to create your own Mp3 Player in android | Android Tutorial
In this article, you will learn how you can create your own application. You will get in touch with concepts like TimePicker, Calendar class, and AlarmManager. You'll learn how to use all these concepts in one application.
PREREQUISITE:
- Installation of Android Studio.
- Must be aware of Java language.
- Basic concepts of android.
What is an Alarm Application?
Alarm application is the need of today's time. Everyone needs an alarm in smartphones. An alarm can be of anything such as a meeting schedule, waking up in the morning, informal meetings. There are various tasks in which people need alarm application to keep their schedule reminded. It is a need of every other people either it is a pupil or office person, a businessman or manager. Time is a power that needs to be the emphasis. Being an android application developer, you can develop an alarm application and take in use to schedule your task.
With the help of the article, you can create your Alarm Application.
Principal Elements Used in Making Of A Alarm Application:
- LinearLayout: It is used as a Layout. It helps in aligning the elements in an organized way. You can give the orientation either horizontally and vertically with the help of
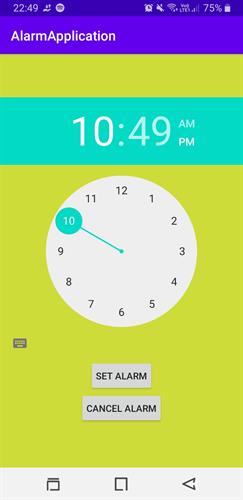
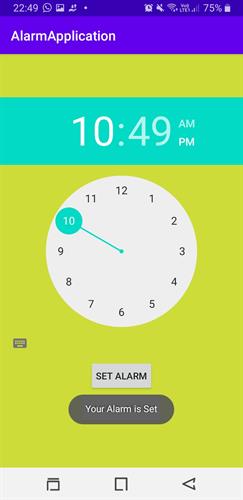
android:orientation="vertical/horizontal" - Button: The Button is used to perform tasks such as setting or canceling the alarm. In this application, two buttons are used. On click of the "SET ALARM" button, the alarm will be altered. On click of the "CANCEL ALARM" button, the alarm will be canceled.
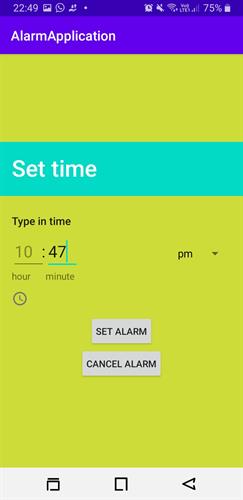
- TimePicker: TimePicker is used to pick the time to set up an alarm. They can represent in two ways that are clock and spinner. Statement through which you can change the Mode is:
android:timePickerMode="clock|spinner"
<?xml version="1.0" encoding="utf-8"?>
<LinearLayout xmlns:android="http://schemas.android.com/apk/res/android"
    xmlns:app="http://schemas.android.com/apk/res-auto"
    xmlns:tools="http://schemas.android.com/tools"
    android:layout_width="match_parent"
    android:layout_height="match_parent"
    android:orientation="vertical"
    android:gravity="center"
    android:background="#CDDC39"
    tools:context=".MainActivity">


    <TimePicker
        android:id="@+id/time"
        android:layout_width="373dp"
        android:layout_height="wrap_content"
        android:timePickerMode="clock"/>

    <Button
        android:id="@+id/set_alarm"
        android:layout_width="wrap_content"
        android:layout_height="wrap_content"
        android:padding="10dp"
        android:text="SET ALARM" />
    <Button
        android:id="@+id/cancel_alarm"
        android:layout_height="wrap_content"
        android:layout_width="wrap_content"
        android:padding="10dp"
        android:text="CANCEL ALARM"/>
</LinearLayout>
Working of MediaPlayer in MainActivity.java file:
- Initially, create the object of elements such as Button, TimePicker with the private access specifier. Allegedly, private access specifier is used to taking the rights from the classes to use the element other than the class in which it's declared.
- Assign the element's id to both the objects created.
- Button "SET ALARM" will call the function setOnClickListener(). In this function, you will create an object of the Calender and call the getInstance method(). Now, set the various functions that are used to set the current year, month, day, hour, minute, and set second to 0.
- A new function is created in the "SET ALARM" function. In this AlarmManager class is used. We call the method of AlarmManager to activate the system service.
- Create an Intent to call another activity.
- setrepeating() AlarmManager function is called so that the alarm will ring every day.
- Button "CANCEL ALARM" will call the function setOnClickListerner(). A new function is created with the name Alarm_cancel(). It will follow the same statements except the AlarmManager will call the cancel function.
package com.example.alarmapplication;

import androidx.annotation.RequiresApi;
import androidx.appcompat.app.AppCompatActivity;

import android.app.AlarmManager;
import android.app.PendingIntent;
import android.content.Context;
import android.content.Intent;
import android.os.Build;
import android.os.Bundle;
import android.view.View;
import android.widget.Button;
import android.widget.TextView;
import android.widget.TimePicker;
import android.widget.Toast;

import java.util.Calendar;

public class MainActivity extends AppCompatActivity implements View.OnClickListener {
    private TimePicker tp;
    private Button btn_set,btn_cancel;

    @Override
    protected void onCreate(Bundle savedInstanceState) {
        super.onCreate(savedInstanceState);
        setContentView(R.layout.activity_main);
        btn_set = findViewById(R.id.set_alarm);
        tp = findViewById(R.id.time);
        btn_cancel=findViewById(R.id.cancel_alarm);
        btn_set.setOnClickListener(this);
        btn_cancel.setOnClickListener(new View.OnClickListener() {
            @Override
            public void onClick(View view) {
                Alarm_cancel();

            }
        });
    }
    @RequiresApi(api = Build.VERSION_CODES.M)
    @Override
    public void onClick(View view) {
        Calendar cal= Calendar.getInstance();
        cal.set(cal.get(Calendar.YEAR),
                cal.get(Calendar.MONTH),
                cal.get(Calendar.DAY_OF_MONTH),
                tp.getHour(),
                tp.getMinute(),
                0);
        Alarm_set(cal.getTimeInMillis());
    }

    private void Alarm_set(long timeInMillis) {
        AlarmManager alarmManager=(AlarmManager) getSystemService(Context.ALARM_SERVICE);
        Intent intent= new Intent(this, Alarm.class);
        PendingIntent pendingIntent=PendingIntent.getBroadcast(this,0,intent,0);
        alarmManager.setRepeating(AlarmManager.RTC_WAKEUP,timeInMillis,AlarmManager.INTERVAL_DAY,pendingIntent);
        Toast.makeText(this,"Your Alarm is Set",Toast.LENGTH_LONG).show();

    }
    private void Alarm_cancel() {
        AlarmManager alarmManager=(AlarmManager) getSystemService(Context.ALARM_SERVICE);
        Intent intent= new Intent(this, Alarm.class);
        PendingIntent pendingIntent=PendingIntent.getBroadcast(this,0,intent,0);
        alarmManager.cancel(pendingIntent);
        Toast.makeText(this,"Your Alarm is Cancel",Toast.LENGTH_LONG).show();

    }

}
Working of Alarm.java Activity
- Create a MediaPlayer and set the default ringtone.
- Start() the ringtone.
ackage com.example.alarmapplication;

import android.content.BroadcastReceiver;
import android.content.Context;
import android.content.Intent;
import android.media.MediaPlayer;
import android.provider.Settings;

public class Alarm extends BroadcastReceiver {
    @Override
    public void onReceive(Context context, Intent intent) {
        MediaPlayer mp=MediaPlayer.create(context, Settings.System.DEFAULT_ALARM_ALERT_URI);
        mp.start();
    }
}
In last, add the permission in the manifest file.
<?xml version="1.0" encoding="utf-8"?>
<manifest xmlns:android="http://schemas.android.com/apk/res/android"
    package="com.example.alarmapplication">

    <application
        android:allowBackup="true"
        android:icon="@mipmap/ic_launcher"
        android:label="@string/app_name"
        android:roundIcon="@mipmap/ic_launcher_round"
        android:supportsRtl="true"
        android:theme="@style/AppTheme">
        <activity android:name=".MainActivity">
            <intent-filter>
                <action android:name="android.intent.action.MAIN" />

                <category android:name="android.intent.category.LAUNCHER" />
            </intent-filter>
        </activity>
        <receiver
            android:name=".Alarm"
            android:enabled="true"
            android:exported="true"
            />
    </application>

</manifest>
OUTPUT: