

Temperature and Humidity Sensor DHT-11
Sensor Description:
Here we are going to explore how DHT11 sensor works, recording values of DHT11 and printing them on Serial monitor of Arduino IDE.
DHT11 is a temperature and humidity sensor that can sense humidity as well as temperature. They measure both the moisture and temperature in the air and express relative humidity as a percentage of the ratio of moisture in the air to the maximum amount that can be held in the air at the current temperature.
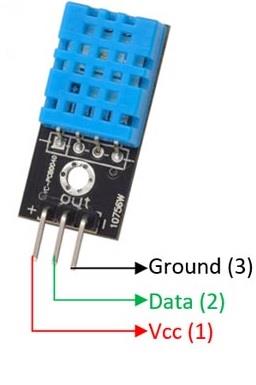
PIN Description:
(-) ve: provide GND to the sensor.
(+) ve: provide power to the sensor
OUT: provide analog output for devices
Connections:
- Connect (-) ve to GND of Arduino
- Connect (+) ve to 5V of Arduino
- Connect OUT PIN to any analog pin of Arduino
Recording and displaying values of Sensor on Serial Monitor:
Step 1: Connect DHT11 to Arduino
- Connect GND to GND of Arduino
- Connect VCC to 5V of Arduino
- Connect SIG PIN to any analog pin of Arduino
Step 2: Download the library from the given link.
Step 3: Upload the code
- Copy the code below in Arduino IDE
- Press the upload icon to upload code to UNO
#include "DHT.h"
#define DHTPIN 2 // what digital pin we're connected to
#define DHTTYPE DHT11   // DHT 11
DHT dht(DHTPIN, DHTTYPE);

void setup() {
  Serial.begin(9600);
  Serial.println("DHT11 Test!");
  dht.begin();
}

void loop() {
  delay(2000); // Wait a few seconds between measurements.
  float h = dht.readHumidity();  //read humidity
  float t = dht.readTemperature();  //read temperature
  Serial.print("Humidity: ");
  Serial.print(h);
  Serial.print(" %\t");
  Serial.print("Temperature: ");
  Serial.print(t);
  Serial.println(" *C ");
}
Step 4: Open Serial Monitor

Conclusion:
Now you can see different values being printed on serial monitor of temperature and humidity. These values are provided by DHT11 sensor to the Arduino IDE. Values will change with the change in TEMP and humidity in environment.
