


What is AWT - Abstract Window Toolkit ?
What is Java AWT?
AWT (Abstract Window Toolkit):
AWT refers to Abstract Window Toolkit. AWT is used for creating Graphical User Interface (GUI). It is a platform-independent API. AWT components use operating system resources with common tools that run on every platform but it looks different on different platforms. It provides different classes such as TextArea, TextField, CheckBox, etc.
AWT Hierarchy
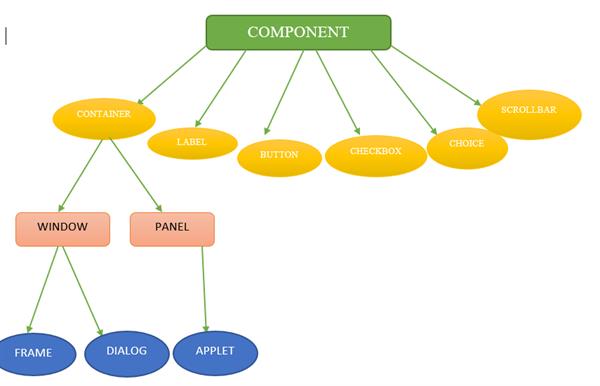
AWT COMPONENT
It is at the top of the AWT hierarchy. It contains all the elements of the visual components. It is responsible for remembering all the current on-going functions such as foreground color, background color, font size, and font.
CONTAINER
A container class is the subclass of the component. It contains all other components such as button, checkbox, choice. It keeps the track of the all the components that are added with other components. Frame, Dialog, and applet are a container class.
WINDOW
The window is a part of the container class. It does not contain any title or a border. We can use frames, dialogs for creating a window.
PANEL
The panel is part of the container class. It does not contain menu bars and title bars. The panel is used for holding other components such as Buttons, TextAreas, TextField.
FRAME
Frame class is a subpart of the window. The frame consists of the menu bar, title bar, and border. It is a generally used attribute while developing an application in AWT. It consists of other components for example button, choices, etc. Most programmers use a frame for developing a window.
DIALOG
Dialog class is also a subpart of the window. It contains border and title. It has no existence without the combining instance of the Frame class.
Example of AWT
For developing a GUI application, the frame is a much-needed attribute. For creating a frame there are two ways:
- By extending the frame class.
- By creating an object of the frame class.
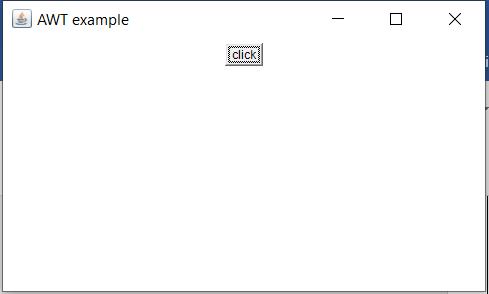
Example by extending the Frame class
import java.awt.*;

public class demo extends Frame{
   demo(){
        Button b=new Button("click");
         b.setBounds(50,50,50,50);
        add(b);
         setSize(500,300);
        setTitle("AWT example");
        setLayout(new FlowLayout());
        setVisible(true);
    }

    public static void main(String args[]){
         demo fr=new demo();
    }
}
OUTPUT
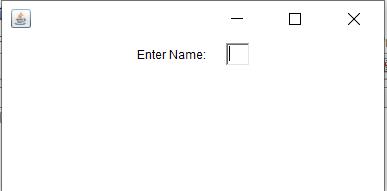
Example by creating an object of the Frame class
import java.awt.*;

public class demo2 {
   demo2()
   {
      Frame fr=new Frame();
      Label lb = new Label("Enter Name: ");
      fr.add(lb);
      TextField t = new TextField();
      fr.add(t);
      fr.setSize(400, 200);
      fr.setLayout(new FlowLayout());
      fr.setVisible(true);
   }

   public static void main(String args[])
   {
       demo2 ex = new demo2();
   }
}
OUTPUT
These are two ways from which you can create a frame in your GUI application.
KEY POINTS
While creating a frame always sets the size of the frame and its visibility. The functions used are:
For size: setSize(int width, int height)

For visibility: setVisible(true)
To add other components
add(components)
To resize the frame size
setResizable(true)The programmers can add n number of components according to the need of its application. There are various other functions also that you can use in creating the application.
