


What are the state management techniques in Asp.Net?
What are the state management techniques in Asp.Net?
We know that web applications work on client-server technology and follows the HTTP protocol. As HTTP protocol is a stateless protocol, it does not store the information provided by the user. This is because the web applications are deployed on a centralized server and the request can come from any random client machine. If the server starts retaining each and every information provided by the user then it will lead to the unnecessary consumption of memory and could even run out of storage. So, Asp.net provides state management techniques to restore the data provided by the user. State Management could also be defined as the process of the persistence of the values between multiple request-response cycles. These state management techniques are of two types:-
- Client-Side State Management Techniques - To maintain the state of values on the client’s machine, we use the client-side state management techniques
- Server-Side State Management Techniques - To maintain the state of values on the server’s machine, we use the server-side state management techniques
|
CLIENT SIDE STATE MANAGEMENT TECHNIQUES |
SERVER SIDE STATE MANAGEMENT TECHNIQUES |
|
· View state and Control State |
· Application State |
|
· Cookies |
· Session State |
|
· Query Strings |
|
|
· Hidden Fields |
|
Client-Side State Management Techniques
- View state
- The view state variable allows retaining data within various post backs. It is a default method of preserving values between distinct roundtrips.
- View state is a default way used by all the Asp.net controls internally to preserve the values.
- The view state variable is defined:- ViewState[“Viewstate_variable_name”]
Here in the square brackets, we provide the name of the view state variable.
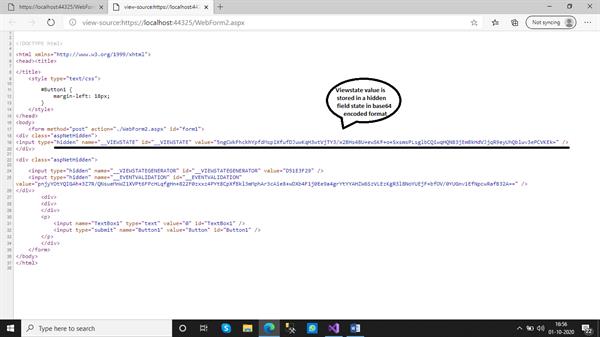
- The value of a view state is stored in base 64 encoded format within the HTML section of the webpage.
- The value of the view state travels between client and server in the form of a hidden view state field.
- Cookies
- A cookie is basically a text file that is stored on the hard drive of a client machine. For instance, if the user logs on into a website, he gets a checkbox to remember the details. If he checks the box, the username and password get stored in the cookies in an encrypted format and get saved into the client’s machine. Now every next the user visits the site, the username and password get loaded from the cookie and the user can surf easily.
- The cookies store the data for the entire web application and not a single web page, unlike the view state. Thus cookies allow passage of values within all the pages of a web application.
- Cookies are of two types- Session Cookie and Persistent Cookie.
Session Cookie- It is one which is created by default by the web server on the client’s machine during a session. This cookie uses a session id.
Persistent Cookie- When we specify the expiration time for a session cookie, it becomes a persistent cookie. This cookie expires as the time outs.
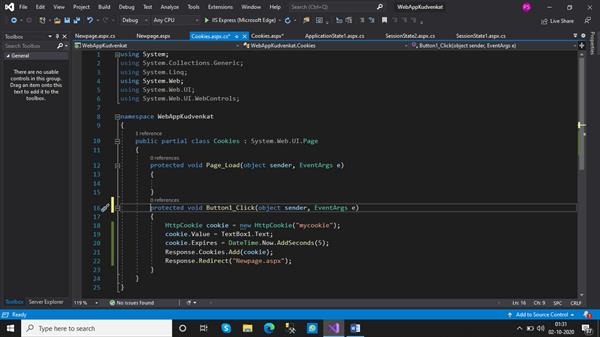
We go through the below code to understand cookies better.
We create an asp.net web application and add a web form named ‘Cookies’ into the project. We drag and drop a textbox and a button into the form. We want that as soon as the button clicked the webpage is navigating to another web page and the value-added in the textbox gets stored in the cookie object and it the displayed on the targeted webpage. We write the code in the click event of the button as follows.
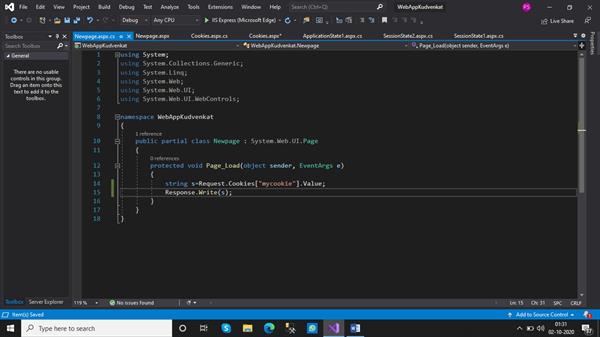
We add a new web form named ‘Newpage’ which behaves as the targeted page and its code is shown below.
OUTPUT: We added the text within the textbox. The data within the textbox is persisted with the help of a cookie.

When the button is clicked, we are navigated to the targeted page and the value restored by the cookie appears within the page.

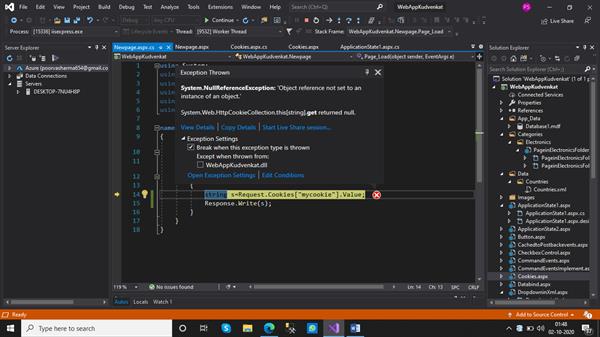
After 5 seconds if I try to refresh the page, I get a null reference exception because the expiration time for the persistent cookie was set to 5 seconds and after that, it does not contain any data and shows the exception.
3. Query Strings
- Query strings are used to retain values on the client-side. They could be understood as a name-value pair that is appended at the end of the URL. Question mark (?) indicates the beginning of a query string. We can even have more than one query strings together. They are appended using the ampersand symbol (&).
- Query strings are visible to the user, therefore they should not be used to send confidential information unless encrypted.
- If we want to read the query string values, we use the ‘Request’ object’s ‘QueryString’ property.
We perform the following steps to understand query strings more.
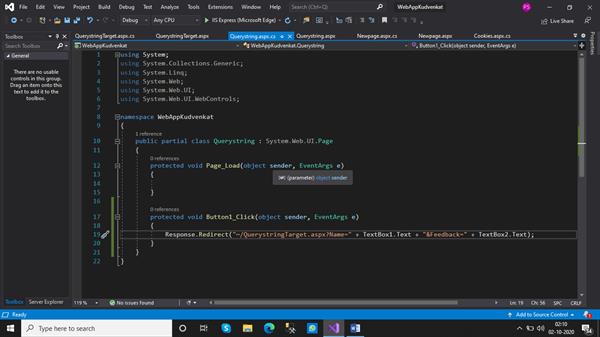
We create an asp.net web application and add a web form named ‘Querystring’. We added two labels and textboxes onto the form. We even add a button control. We want that when the button is clicked the web page is navigated to another webpage and the data in the textboxes appears on the targeted page. Here the data is restored using the query string. The code for ‘Querystring’ class is as follows.
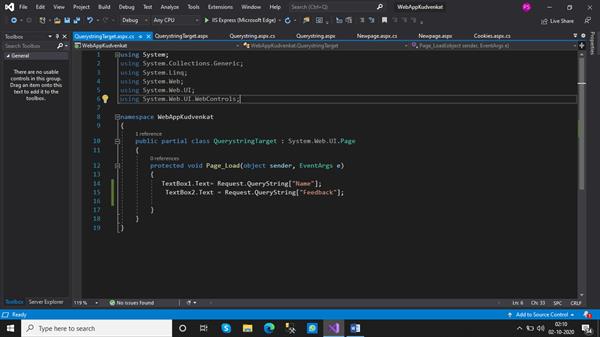
Now we add another web form named ‘QuerystringTarget’. The code within this form is as follows
OUTPUT: We enter data within the textboxes and click the button

The data retrieved from the text boxes of the previous page appears on the targeted page. This preservation of data is carried out by query string

4. Hidden Fields
- The hidden field is a standard control for storing string value. It is internally implemented with Viewstate like any other Asp.net control.
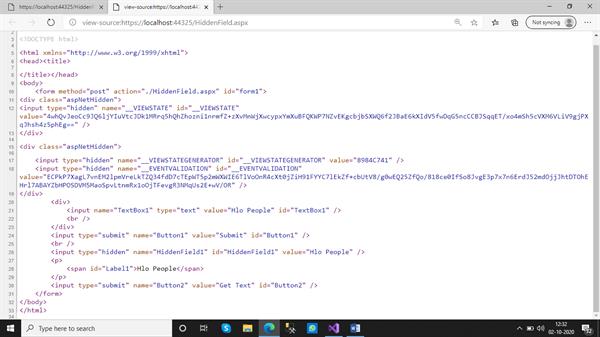
- Whatever, we store in the hidden field would be stored as a ViewState inside the HTML page source and would not be lost during various postbacks.
- Just like a view state, it stores the page-specific information.
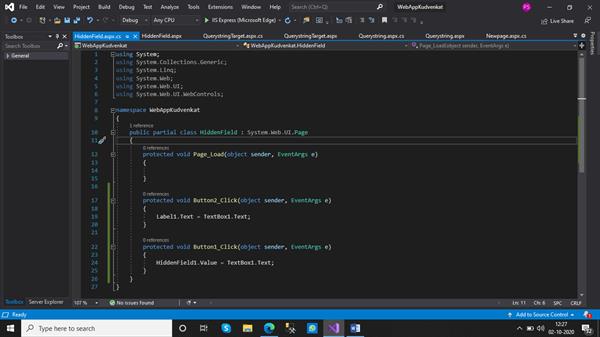
In order to understand hidden field control, we can implement the below code.
We dragged and dropped hidden field control, label, text boxes, and button onto the web form. We want the web application to run in a way such that whenever we enter something in the textbox, on clicking the submit button, the text in the textbox is stored in the hidden field. And when we click the ‘Get Text’ button we are able to display the value in the hidden field into the label.
OUTPUT: When the page is loaded, we enter the text in the textbox and click the submit button. An important point to note is that hidden field control is not visible to the user.

When we click the ‘Get Text’ button, the text in the textbox is displayed into the label.

Internally the hidden field is implemented in accordance with the views state.
Server-Side State Management Techniques
- Session State
- Whenever a user makes the first request to the web application, it enables the start of a new session. And during the session, the user performs a number of reads and write operations with the website. So as the session starts, we can use a session object to store the values on the server-side.
- The session enables the persistence of values across all the pages for a given session, unlike a view state which stored the values for a particular page.
- Session state variables are stored on the webserver.
- Session state variables are cleared when the user session times out. The default time for a session to exist is 20 minutes. This can be changed to another value in the web.config file occurring in the solution explorer.
- Syntax to declare Session State variable
Session[“SessionState_VariableName”]To understand the session state even better, we create an Asp.net web application and add a web form and named it as ‘Session State 1’. We dragged and dropped a button control and textbox onto the form. Now we want that as and when the button has clicked the value in the textbox should be incremented by 1. To add the functionality of the button control we did the following coding in the code behind file.
We add one more web form in the same project and name this form as ‘Session State2’. We did the exactly same coding as done in the ‘Session State 1’ web form.
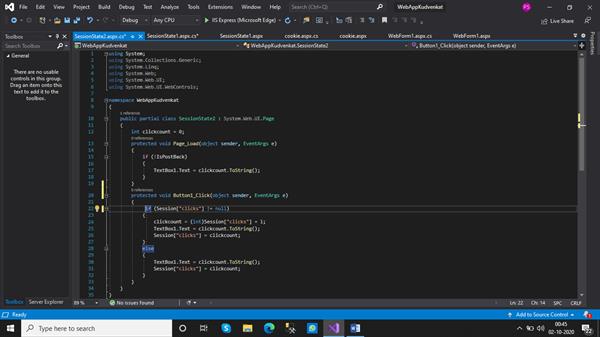
Now we set ‘Session State 1’ as start page and execute the project.
OUTPUT:-

We observe that with every button click, the value in the textbox is successfully incremented to 1. Now if in the URL we type Session State 2 instead of 1, we are requesting the second form. We observe that when the form2 loads and when we click the button control the value of the textbox is retained and gets continued from the position we left it in the first form. Thereby, proving that the data is shared among all web pages of a session.

2. Application State
- Application State variables are available across all pages (similar to session) and all sessions verifying it as multi user and global data. Even if the session is changed, the data is retained and not lost.
- Application State variables are stored on the webserver.
- Application State variables are cleared when the process hosting the application is restarted.
- Syntax to declare Application State variable
- Application [“ApplicationState_VariableName”]
- An application state could be used to calculate the number of users visiting a website.
To understand application state even better, we create an Asp.net web application and add a web form and named it as ‘Application State 1’. We dragged and dropped a button control and textbox onto the form. Now we want that as and when the button has clicked the value in the textbox should be incremented by 1. To add the functionality of the button control we did the following coding in the code behind the file.

We add one more web form in the same project and name this form as ‘Application State2’. We did exactly the same coding as done in the ‘Application State 1’ web form.
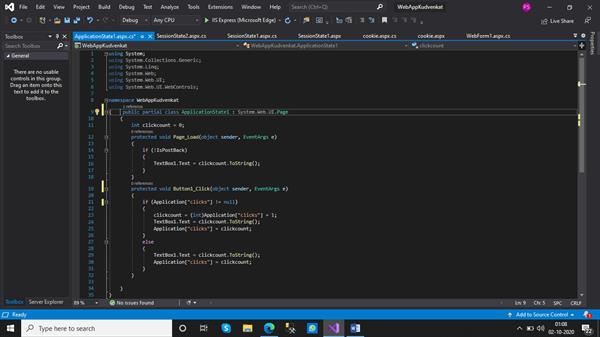
Now we set ‘Application State 1’ as the start page and execute the project.
OUTPUT:-

We observe that with every button click, the value in the textbox is successfully incremented to 1. Now if in the URL we type Application State 2 instead of 1, we are requesting the second form. We observe that when the form2 loads and when we click the button control the value of the textbox is retained and gets continued from the position we left it in the first form. Thereby, proving that the data is shared among all web pages.

Now if I copy the URL of the Application State1 web form and open it in some other browser. This leads to the creation of different browser instance and hence a session. When we clicked the button, we observe that the value in the textbox is again incremented by 1 from the position where we left in the previous session.

Hence, the above code proves that application state variables allow the persistence of values among different webpages and different sessions.
